Easy to prepare, tender and tasty flat cakes. Very, very cheesy, because the cheese is put in the dough and in the filling! You can take several varieties of cheese – and it will be even tastier!
Summary
| Cook Time | 40 mins |
| Total Time | 40 mins |
| Course | Dessert |
| Servings (Default: 6) |
 Ingredients
- Kefir – 1 Glass
- Egg – 1 Piece
- Wheat flour / grade – 1 Glass
- Sugar – 1 Teaspoon
- Salt – 0.5 Teaspoon
- Soda – 0.5 Teaspoon
- Cheese – 250 Grams (any, preferably a mixture of different varieties)
- Greens – 2 Bunches (different to taste)
- Vegetable oil – To taste (for frying)

Instructions
- In a convenient bowl, combine kefir with egg, salt, sugar and some grated cheese. I added about 100 grams. Also add a spoonful of chopped greens.
- Add flour sifted with baking soda.
- Knead a soft, pliable dough, it may take a little more flour.
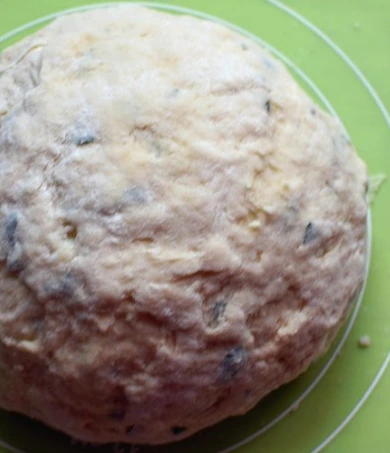
- Roll the dough into a ball and cover with a bowl, let it sit for 15 minutes.
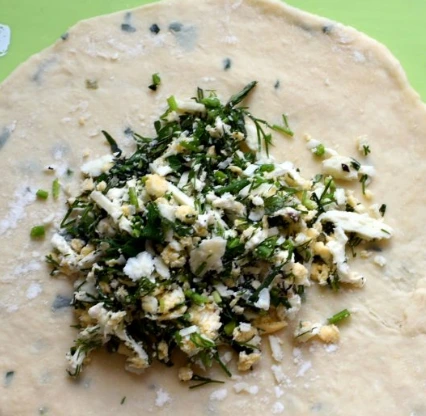
- During this time, grate the cheese for the filling. Feel free to take 2-3-4 species – it will only be tastier! I took Dutch, Adyghe, a little gouda and melted fetax. Add chopped herbs to the cheese. Take greens to taste too, the main thing is to dry them well before cutting. I took dill, green onions, some parsley and mint. Mix well, the filling is ready.
- Cut off pieces the size of a medium egg from a common dough. Keep the rest of the dough under the lid.
- Roll each piece into a thin flat cake. Put some filling in the middle, gather the edges of the dough towards the middle into a knot.
- Pinch well and roll back into a flat cake to fit the pan.
- Fry the tortillas in a well-heated skillet with a little oil, turning over. The cakes first swell, then gradually fall off. I will give advice: it is better to fry such cakes in a frying pan without an anti-stick coating, then the cakes will fry faster and will be rosy.
- Put the finished cakes on a wire rack or paper if there was a lot of oil during frying.
- Serve immediately, hot, hot! Delicious!


Bon appetit!


About Editorial Staff
The Boss Kitchen editorial staff oversees content review, fact-checking, and recipe verification across the site. Published articles pass through the editorial team before going live, ensuring ingredient lists, techniques, cooking times, and nutritional claims hold up in a home kitchen. The team coordinates contributions across the site writers, handles reader corrections, and maintains consistency in measurement conventions, safety guidance, and dietary labeling. Posts under this byline typically represent team-reviewed reference material, site announcements, or editorial roundups rather than individual-author features, and they are held to the same sourcing standards as bylined recipe and product coverage.
Get FREE Recipe Gifts now. Or latest free cooktops from our best collections.
Disable Ad block to get all the secrets. Once done, hit any button below