Kurnik – Russian Layered Pirog with Chicken
by Editorial Staff
Summary
| Prep Time | 3 hrs |
| Cook Time | 1 hr 20 mins |
| Total Time | 16 hrs 20 mins |
| Course | Appetizers & Snacks |
| Cuisine | European |
| Servings (Default: 6) |
 Ingredients
For the dough:
- 500g flour
- 0.5 teaspoon ½ salt
- 0.5 teaspoon ½ soda
- 200 g butter
- 4 tablespoon kefir
For the filling: (chicken filling)
- 1 chicken
- 3 onion (s)
- 3 cloves garlic
- 2 carrot (s)
- 2 stalks celery
- 20 g butter
- 2 bay leaves
- 10 peppercorns
- 4 clove (s)
- 1 ½ teaspoon salt
- 500 g mushrooms
- 2 tablespoon parsley, finely chopped
- 2 teaspoons lemon juice
- nutmeg
- 50 g butter
- 100 ml sweet cream
- salt and pepper
For the filling: (rice filling)
- 150 g rice
- 4 onion (s)
- 50 g butter
For the filling: (egg filling)
- 5 egg (s), hard-boiled
- 4 tablespoon dill, finely chopped
For painting:
- 2 egg yolks
- 1 egg white
- 50 ml sweet cream
Instructions
- The name of the dish Kurnik is derived from Kuritsa, the Russian word for chicken. Accordingly, the chicken meat is a flavor-determining component. A kurnik is especially served at celebrations. The specified amount gives a volume of about 2.5 liters.
- For the preparation it is best to cook the chicken the day before. To do this, roughly dice the onions, carrots and celery, sauté in a large saucepan with butter, pour cold water and add the chicken, the spices and the salt. Bring slowly to the boil and cook on a low heat for almost an hour. Skim off any foam that occurs. Let cool down.
- Start preparing the dough the next day. Mix the flour with the salt and the soda. Add the very cold butter, cut into small cubes, and knead until the flour has a crumbly consistency. Gradually add the kefir and knead to form a smooth, slightly damp dough. Wrap with cling film and let rest in the refrigerator for at least two hours.
- In the meantime, prepare the various fillings.
- Remove the chicken from the broth, remove the skin and cut the meat into small cubes. Drain the chicken stock through a sieve and squeeze the vegetables vigorously. Set aside the broth for later.
- Clean the mushrooms and cut them into slices. Fry them in the pan without fat for about five minutes until they are cooked through. Add the butter and let it melt. Add to the chicken pieces. Add the cream and 100 milliliters of the chicken stock, the chopped parsley. Mix well and season with the lemon juice, nutmeg, salt and pepper. Put aside.
- For the rice layers, bring about 350 milliliters of the chicken stock to a boil. Add the rice and let it cook on a low flame, stirring occasionally. Add more stock if necessary. In the meantime, cut four onions into thin rings and fry them in the butter until golden brown. Mix the finished onion rings with the rice.
- Now finely dice the hard-boiled eggs and mix with the dill and you can finally start making the pie.
- Take the dough out of the fridge and divide it in two. You need a much larger piece for the pie top. Roll out thinly on a floured surface. Flour a bowl that is big enough to hold all the ingredients and line it with the sheet of dough. It has to withstand a bit on all sides. Lay out a third of the rice at the bottom. Half of the chicken mixture and half of the egg mixture on top. There is another layer of rice, chicken, egg and finally the rest of the rice. Also roll out the second piece of dough, brush the protruding edge of the pie top with egg white and press the two pieces of dough together firmly all around. There should be no air bubble left in the pie. Cut off excess pieces of dough.
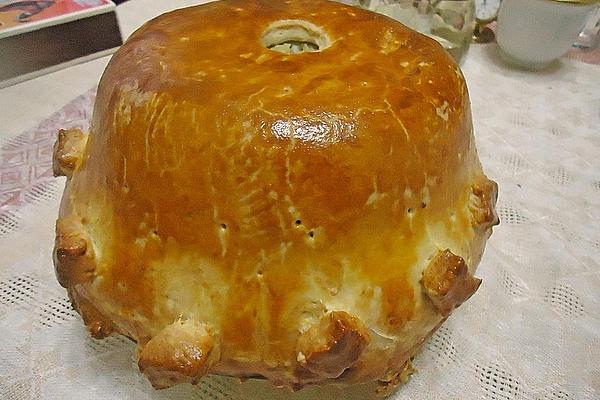
- Now turn the kurnik out onto a large plate. Poke a round hole about three centimeters in diameter in the upper center so that the steam can escape. Mix the egg yolks with the cream and brush the pie all over so that it gets a golden yellow color when baking. Pierce small holes all around with a toothpick for ventilation. For decoration, various ornaments can be cut out of the remaining pieces of dough and glued all around the dough. If the kurnik is being served at a wedding, one likes to form two intertwined rings.
- Place on the plate in the oven preheated to 160 degrees and bake for eighty minutes. If you choose a different shape, e.g. as an elongated roll, increase the temperature to 200 degrees and shorten the cooking time to 45 minutes.
- Serve hot.
 Also Like

The perfect russian layered salad recipe with a picture and simple step-by-step instructions. More...

Incredible dough! Yeast dough with sour cream – very tender! A pie made from such a dough does not stale for a long time. After cooking, you can heat it up in the microwave for another 2-3 days, and the chicken will remain as soft. The filling of chicken,...

Russian Tuna Salad or Layered Salad
The perfect russian tuna salad or layered salad recipe with a picture and simple step-by-step instructions. More...

Russian Layered Salad `Herring in Fur Coat`
The perfect russian layered salad `herring in fur coat` recipe with a picture and simple step-by-step instructions. More...

Pie with Layer Filling According To Old Russian Recipe
The perfect pie with layer filling according to old russian recipe recipe with a picture and simple step-by-step instructions. More...

The perfect fried chicken layer salad recipe with a picture and simple step-by-step instructions. More...

Layered Salad with Chicken and Almonds
The perfect layered salad with chicken and almonds recipe with a picture and simple step-by-step instructions. More...

Plov – Russian Rice Pan with Chicken
The perfect plov – russian rice pan with chicken recipe with a picture and simple step-by-step instructions. More...

The perfect crème russian recipe with a picture and simple step-by-step instructions. More...

The perfect black russian recipe with a picture and simple step-by-step instructions. More...

The perfect russian applecake recipe with a picture and simple step-by-step instructions. More...

The perfect russian beef recipe with a picture and simple step-by-step instructions. More...

The perfect russian beets recipe with a picture and simple step-by-step instructions. More...

What is the difference between Russian borscht? I read that it is cooked without potatoes. In addition, cabbage is placed less than in Ukrainian borscht, and fat is not added. Borscht can be cooked in meat broth or lean. Cook: 1 hour Servings: 8 Ingredien...

The perfect russian braid recipe with a picture and simple step-by-step instructions. More...

The perfect russian brawn recipe with a picture and simple step-by-step instructions. More...

The perfect russian bread recipe with a picture and simple step-by-step instructions. More...

The perfect russian cake recipe with a picture and simple step-by-step instructions. More...

The perfect russian chocolate recipe with a picture and simple step-by-step instructions. More...

The perfect russian coffee recipe with a picture and simple step-by-step instructions. More...
Comments for "Kurnik – Russian Layered Pirog with Chicken"
 |
 |
 |
 |
Best Food Ideas
Get FREE Recipe Gifts now. Or latest free cooktops from our best collections.
Disable Ad block to get all the secrets. Once done, hit any button below
|
|
|
|